linux开启wifi

iwlwifi

1
2
3
4
5
6
sudo apt-get install firmware-iwlwifi

modprobe iwlwifi


1
2
3
#ifconfig
$ sudo apt install net-tools
$ ifconfig

enp109s0f1: flags=4163<UP,BROADCAST,RUNNING,MULTICAST> mtu 1500
inet 192.168.5.141 netmask 255.255.255.0 broadcast 192.168.5.255
inet6 fe80::82fa:5bff:fe3e:b84c prefixlen 64 scopeid 0x20
ether 80:fa:5b:3e:b8:4c txqueuelen 1000 (Ethernet)
RX packets 9829 bytes 5164328 (4.9 MiB)
RX errors 0 dropped 0 overruns 0 frame 0
TX packets 10728 bytes 2469498 (2.3 MiB)
TX errors 0 dropped 0 overruns 0 carrier 0 collisions 0

lo: flags=73<UP,LOOPBACK,RUNNING> mtu 65536
inet 127.0.0.1 netmask 255.0.0.0
inet6 ::1 prefixlen 128 scopeid 0x10
loop txqueuelen 1000 (Local Loopback)
RX packets 24 bytes 2540 (2.4 KiB)
RX errors 0 dropped 0 overruns 0 frame 0
TX packets 24 bytes 2540 (2.4 KiB)
TX errors 0 dropped 0 overruns 0 carrier 0 collisions 0

wlp110s0: flags=4099<UP,BROADCAST,MULTICAST> mtu 1500
ether b2:6f:32:64:0a:75 txqueuelen 1000 (Ethernet)
RX packets 0 bytes 0 (0.0 B)
RX errors 0 dropped 0 overruns 0 frame 0
TX packets 0 bytes 0 (0.0 B)
TX errors 0 dropped 0 overruns 0 carrier 0 collisions 0

enp109s0f1 eth0

wlp110s0 wlan0

1
2
3
4
sed -n '/GRUB_CMDLINE_LINUX=/s/""/"net.ifnames=0 biosdevname=0"/'p  /etc/default/grub
GRUB_CMDLINE_LINUX="net.ifnames=0 biosdevname=0"

sudo sed -i '/GRUB_CMDLINE_LINUX=/s/""/"net.ifnames=0 biosdevname=0"/' /etc/default/grub

grub-mkconfig -o /boot/grub/grub.cfg ?

create_ap

https://github.com/oblique/create_ap

1
2
3
git clone https://github.com/oblique/create_ap
cd create_ap
make install

install -Dm755 create_ap /usr/bin/create_ap
install -Dm644 create_ap.conf /etc/create_ap.conf
[ ! -d /lib/systemd/system ] || install -Dm644 create_ap.service /usr/lib/systemd/system/create_ap.service
[ ! -e /sbin/openrc-run ] || install -Dm755 create_ap.openrc /etc/init.d/create_ap
install -Dm644 bash_completion /usr/share/bash-completion/completions/create_ap
install -Dm644 README.md /usr/share/doc/create_ap/README.md
docker二进制安装

下载

docker二进制包获取地址:https://download.docker.com/linux/static/stable/x86_64/

1
2
$ tar -zxvf docker*.tgz
$ cp docker/* /usr/bin
  1. Go to https://download.docker.com/linux/debian/dists/.

  2. Select your Debian version in the list.

  3. Go to pool/stable/ and select the applicable architecture (amd64, armhf, arm64, or s390x).

  4. Download the following deb files for the Docker Engine, CLI, containerd, and Docker Compose packages:

    • containerd.io_<version>_<arch>.deb
    • docker-ce_<version>_<arch>.deb
    • docker-ce-cli_<version>_<arch>.deb
    • docker-buildx-plugin_<version>_<arch>.deb
    • docker-compose-plugin_<version>_<arch>.deb
  5. Install the .deb packages. Update the paths in the following example to where you downloaded the Docker packages.

    1
    2
    3
    4
    5
    $ sudo dpkg -i ./containerd.io_<version>_<arch>.deb \
    ./docker-ce_<version>_<arch>.deb \
    ./docker-ce-cli_<version>_<arch>.deb \
    ./docker-buildx-plugin_<version>_<arch>.deb \
    ./docker-compose-plugin_<version>_<arch>.deb

json

daemon.json

1
2
3
4
5
6
7
8
9
10
11
12
13
cat >> /etc/docker/daemon.json <<EOF
{
"data-root": "/home/cs/data/docker",
"registry-mirrors" : [
"http://hub-mirror.c.163.com"
],
"insecure-registries":[
"https://k8s.org"
],
"debug" : true,
"experimental" : true
}
EOF

proxy

CLI

https://docs.docker.com/engine/cli/proxy/

~/.docker/config.json 通过容器中的环境变量使用代理

1
2
3
4
5
6
7
8
{
"proxies":{
"default": {
"httpProxy": "http://127.0.0.1:7897",
"httpsProxy": "https://127.0.0.1:7897",
"noProxy": "localhost,127.0.0.1,192.0.0.0/8,*.local.org,k8s.org"
}
}
daemon

/etc/docker/daemon.json

1
2
3
4
5
6
7
8
 ,
"proxies":{
"http-proxy": "http://127.0.0.1:7897",
"https-proxy": "https://127.0.0.1:7897",
"no-proxy": "localhost,127.0.0.1,192.0.0.0/8,*.local.org,k8s.org"
}

sudo systemctl restart docker

fstab挂盘

格式化

原盘

1
2
3
4
5
6
7
8
9
10
11
12
13
14
15
16
17
18
❯ lsblk -o name,uuid,FSTYPE,size
NAME UUID FSTYPE SIZE
sda 931.5G
├─sda1 70BE7BF5BE7BB1E8 ntfs 250G
├─sda2 0FE407890FE40789 ntfs 200.5G
├─sda3 62711307D9630248 ntfs 108.6G
├─sda4 b519f517-5f11-4108-8601-e456e3da4fd1 xfs 100.9G
├─sda5 0CFA1DD20CFA1DD2 ntfs 150.8G
└─sda6 2006966506963BAA ntfs 120.7G
nvme0n1 1.8T
├─nvme0n1p1 8aef5178-364f-47de-9016-3b3bb254aadd ext4 55.9G
├─nvme0n1p2 ff3aedfa-1448-4161-95fb-3b43fddf4506 ext4 55.9G
├─nvme0n1p3 8c8a753d-b3f4-45ee-b2a8-629c13f4c18e ext4 195.6G
├─nvme0n1p4 a40908d9-e0e9-4d17-8aad-d7e1a1f90730 ext4 353.9G
├─nvme0n1p5 bb259291-c221-4e34-b422-663e0bea289e swap 7.5G
├─nvme0n1p6 E509-52C5 vfat 553M
└─nvme0n1p7 7A1276B712767849 ntfs 80G

格式xfs

1
sudo apt-get install xfsprogs
1
2
3
4
5
6
7
8
9
10
11
12
❯ sudo mkfs.xfs /dev/sda3 -f
meta-data=/dev/sda3 isize=512 agcount=4, agsize=7117869 blks
= sectsz=4096 attr=2, projid32bit=1
= crc=1 finobt=1, sparse=1, rmapbt=0
= reflink=1 bigtime=0
data = bsize=4096 blocks=28471475, imaxpct=25
= sunit=0 swidth=0 blks
naming =version 2 bsize=4096 ascii-ci=0, ftype=1
log =internal log bsize=4096 blocks=13902, version=2
= sectsz=4096 sunit=1 blks, lazy-count=1
realtime =none extsz=4096 blocks=0, rtextents=0

/dev/sda3 contains a mounted filesystem 需要是非挂载状态
/dev/sda3 appears to contain an existing filesystem (ntfs). 其他格式使用-f强制

生成新的uuid

1
2
3
❯ sudo blkid /dev/sda3
/dev/sda3: UUID="f8354fa6-cc44-4591-8995-b9cbdbd3c2a9" BLOCK_SIZE="4096" TYPE="xfs" PARTLABEL="Basic data partition" PARTUUID="ce05cf5a-d347-4101-98d1-fc27e7659c5b"

挂载到/etc/fstab

1
2
3
4
5
❯ sudo mv  /home/cs/data/kvm  /home/cs/data/kvms
❯ sudo mousepad /etc/fstab
❯ sudo mount -a
❯ sudo mv /home/cs/data/kvms/* /home/cs/data/kvm

#/data was on /dev/sda3 during installation

UUID=f8354fa6-cc44-4591-8995-b9cbdbd3c2a9 /home/cs/data/kvm xfs defaults 0 2

1
2
sudo systemctl stop libvirtd
sudo systemctl start libvirtd

挂盘

/etc/fstab

1
2
3
4
5
#cat /etc/fstab
# /boot/efi was on /dev/sda2 during installation
UUID=FF6E-1E1A /boot/efi vfat umask=0077 0 1
# /home was on /dev/sda6 during installation
UUID=abca56cf-7ab5-4c4a-a5ab-f4b2ebdc0c82 /home ext4 defaults 0 2

ext3、ext4、xfs、swap

auto - 在启动时或键入了 mount -a 命令时自动挂载

exec - 允许执行此分区的二进制文件。

ro - 以只读模式挂载文件系统。
rw - 以读写模式挂载文件系统。

suid - 允许 suid 操作和设定 sgid 位 临时提权操作

defaults - 使用文件系统的默认挂载参数,例如 ext4 的默认参数为:rw, suid, dev, exec, auto, nouser, async.

dump 工具通过它决定何时作备份. dump 会检查其内容,允许的数字是 0 和 1 。0 表示忽略, 1 则进行备份

数值来决定需要检查的文件系统的检查顺序。允许的数字是0, 1, 和2。 根目录应当获得最高的优先权 1, 其它所有需要被检查的设备设置为 2. 0 表示设备不会被 fsck 所检查。

os信息备份

系统版本

1
2
3
4
5
6
cat /etc/redhat-release
CentOS Linux release 7.6.1810 (Core)


# uname -r
3.10.0-957.el7.x86_64

el7是RHEL7系列的,centos7看到

1
2
❯ uname -r
6.1.0-0.deb11.7-amd64

debian11

图形界面

xface

1
2
3
4
5
6
7
8
#查看当前启动模式
systemctl get-default

#由命令行模式更改为图形界面模式
systemctl set-default graphical.target

#由图形界面模式更改为命令行模式
systemctl set-default multi-user.target

命令行界面—>图形界面

执行startx命令

图形界面—>命令行界面

Ctrl+Alt+F2

CPU信息

1
❯ sudo dmidecode | grep -A16 "Memory Device" | grep 'Type:\|Speed\|Size:' |grep -v "Unknown\|Installed\|Range"

Size: 8 GB
Type: DDR4
Speed: 2400 MT/s
Size: 8 GB
Type: DDR4
Speed: 2400 MT/s

CPU主频:

1
❯ sudo dmidecode -t processor | grep "Speed"

Max Speed: 8300 MHz

Current Speed: 2700 MHz

1
2
3
4
5
6
7
8
9
10
11
12
13
❯ lscpu | grep "MHz"
CPU MHz: 3400.159
CPU max MHz: 3800.0000
CPU min MHz: 800.0000
❯ cat /proc/cpuinfo | grep "cpu MHz"
cpu MHz : 3399.938
cpu MHz : 3471.310
cpu MHz : 3446.992
cpu MHz : 3497.726
cpu MHz : 3445.833
cpu MHz : 3496.419
cpu MHz : 3448.879
cpu MHz : 943.164
1
2
❯ cat /sys/devices/system/cpu/cpu0/cpufreq/cpuinfo_max_freq
3800000

引导

启动

1
2
3
4
5
6
7
8
#选择系统图
/usr/share/grub/themes/breeze
#themes配置
/usr/share/grub/themes/breeze/theme.txt


#启动图
/usr/share/images/desktop-base/desktop-grub.png

双系统boot

1
2
3
4
5
6
7
8
9
10
11
12
13
14
15
16
cs@debian:~$ sudo tree /boot/efi/EFI -L 2
/boot/efi/EFI
├── Boot
│   └── bootx64.efi
├── debian
│   ├── BOOTX64.CSV
│   ├── fbx64.efi
│   ├── grub.cfg
│   ├── grubx64.efi
│   ├── mmx64.efi
│   └── shimx64.efi
└── Microsoft
└── Boot

4 directories, 7 files

1
2
3
4
5
6
7
8
9
10
cs@debian:~$ sudo update-grub
Generating grub configuration file ...
Found background image: /usr/share/images/desktop-base/desktop-grub.png
Found linux image: /boot/vmlinuz-5.10.0-21-amd64
Found initrd image: /boot/initrd.img-5.10.0-21-amd64
Warning: os-prober will be executed to detect other bootable partitions.
Its output will be used to detect bootable binaries on them and create new boot entries.
Found Windows Boot Manager on /dev/sda2@/EFI/Microsoft/Boot/bootmgfw.efi
Adding boot menu entry for UEFI Firmware Settings ...
done

https://www.cnblogs.com/coding-my-life/p/12817690.html

vagrant

doc https://developer.hashicorp.com/vagrant/docs

box

kvm libvirt

virtualbox

https://app.vagrantup.com/boxes/search

1
2
3
4
$ vagrant box list
centos/7 (libvirt, 7.1.0)
centos/7 (virtualbox, 7.1.0)

add

**vagrant box add metadata.json**

1
2
3
4
5
6
7
8
9
10
11
12
cat >metadata.json <<EOF
{
"name": "centos/7",
"versions": [{
"version": "7.1.0",
"providers": [{
"name": "virtualbox",
"url": "file:///home/cs/data/VM/VirtualBox/CentOS-7-x86_64-Vagrant-2004_01.VirtualBox.box"
}]
}]
}
EOF

visual studio code

tempCodeRunnerFile.go

方法一
在setting.json中添加

1
2
3
{
"code-runner.ignoreSelection": true
}

方法二
在设置中搜索selection并勾选Whether to ignore selection to always run entire file.

语言文件模板

文件首选项配置用户代码片段

python

1
2
3
4
5
6
7
8
9
10
11
12
13
14
15
16
17
18
19
20
21
22
23
24
25
26
27
28
29
30
31
32
33
{
// Place your snippets for python here. Each snippet is defined under a snippet name and has a prefix, body and
// description. The prefix is what is used to trigger the snippet and the body will be expanded and inserted. Possible variables are:
// $1, $2 for tab stops, $0 for the final cursor position, and ${1:label}, ${2:another} for placeholders. Placeholders with the
// same ids are connected.
// Example:
// "Print to console": {
// "prefix": "log",
// "body": [
// "console.log('$1');",
// "$2"
// ],
// "description": "Log output to console"
// }
"HEADER":{
"prefix": "header",
"body": [
"#!/usr/bin/env python",
"# -*- encoding: utf-8 -*-",
"'''",
"@File : $TM_FILENAME",
"@Time : $CURRENT_YEAR-$CURRENT_MONTH-$CURRENT_DATE $CURRENT_HOUR:$CURRENT_MINUTE:$CURRENT_SECOND",
"@Author : shea",
"@Email : xxxxx@xxx.com",
"@Desc : -----",

"'''",
"",
"# here put the import lib",
""
],
}
}

java

1
2
3
4
5
6
7
8
9
10
11
12
13
14
15
16
17
18
19
20
21
22
23
24
25
26
{
// Place your snippets for java here. Each snippet is defined under a snippet name and has a prefix, body and
// description. The prefix is what is used to trigger the snippet and the body will be expanded and inserted. Possible variables are:
// $1, $2 for tab stops, $0 for the final cursor position, and ${1:label}, ${2:another} for placeholders. Placeholders with the
// same ids are connected.
// Example:
// "Print to console": {
// "prefix": "log",
// "body": [
// "console.log('$1');",
// "$2"
// ],
// "description": "Log output to console"
// }
"Java Main Method": {
"prefix": "main",
"body": [
"public class ${1:HelloWorld} {",
" public static void main(String[] args) {",
" System.out.println(\"Hello, World!\");",
" }",
"}"
],
"description": "Insert a main method in Java"
}
}

visual studio code

downlocad

https://code.visualstudio.com/download

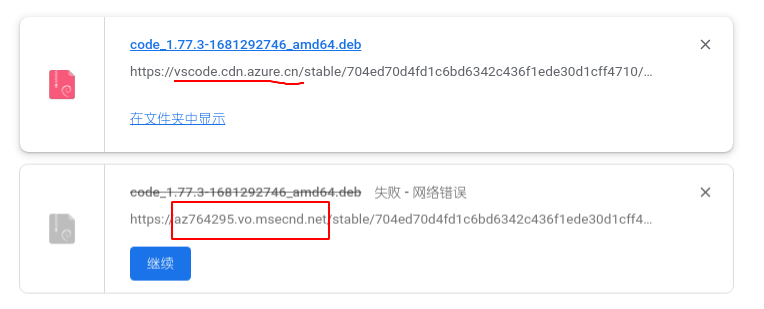
替换成国内cdn vscode.cdn.azure.cn

cdn

https://az764295.vo.msecnd.net/stable/704ed70d4fd1c6bd6342c436f1ede30d1cff4710/code-stable-x64-1681293081.tar.gz

插件

~/.vscode/extensions/

Code Runner

运行多种语言的代码片段或代码文件,省掉保存的环节,直接可以运行

Better Comments

美化注释,可以将我们的多行注释按照类别自动高亮

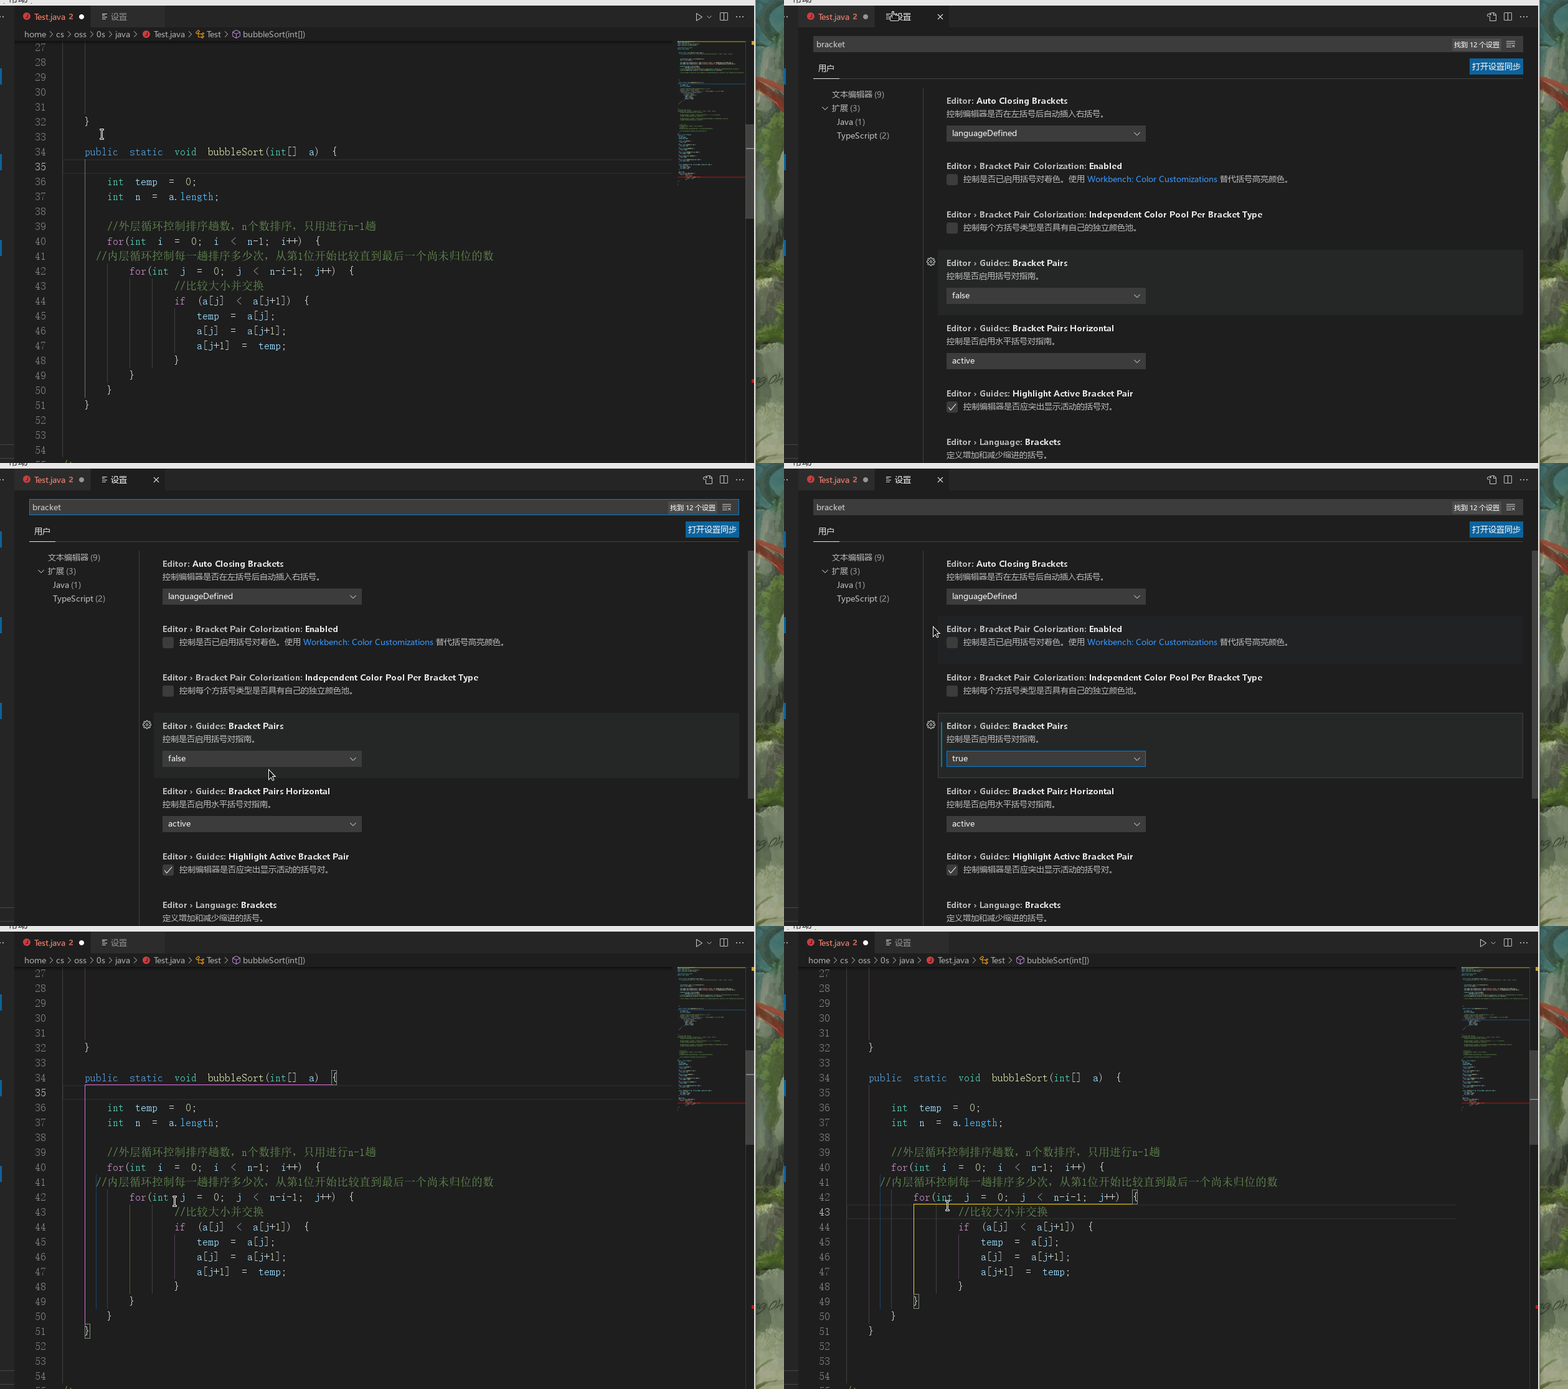
Bracket

系统已内置

括号折线匹配高亮,让代码缩进更清晰

Bracket Pair Colorizer

bracket

载入天数...载入时分秒... ,