阿帅
搜索
OpenTelemetry
otel
installation
doc https://opentelemetry.io/docs/collector/installation/
1 | ❯ helm repo add open-telemetry https://open-telemetry.github.io/opentelemetry-helm-charts |
1 | ❯ helm template my-release ./opentelemetry-collector/ --values ./opentelemetry-collector/value.yaml |
mode**=**<daemonset**|**deployment**|**statefulset>
network cidr ip
ip
kube-apiserver
kube-controller-manager
kubelet
flannel
etcd
coredns
1 | [root@k8s01 opt]# zgrep "cluster-cidr\|cluster-ip" /etc/kubernetes/manifests/* |
service-cluster-ip-range 用于指定服务(Service)的ClusterIP的IP地址范围
cluster-cidr 集群的Pod网络地址范围,所有Pod都应该在这个范围内分配IP地址
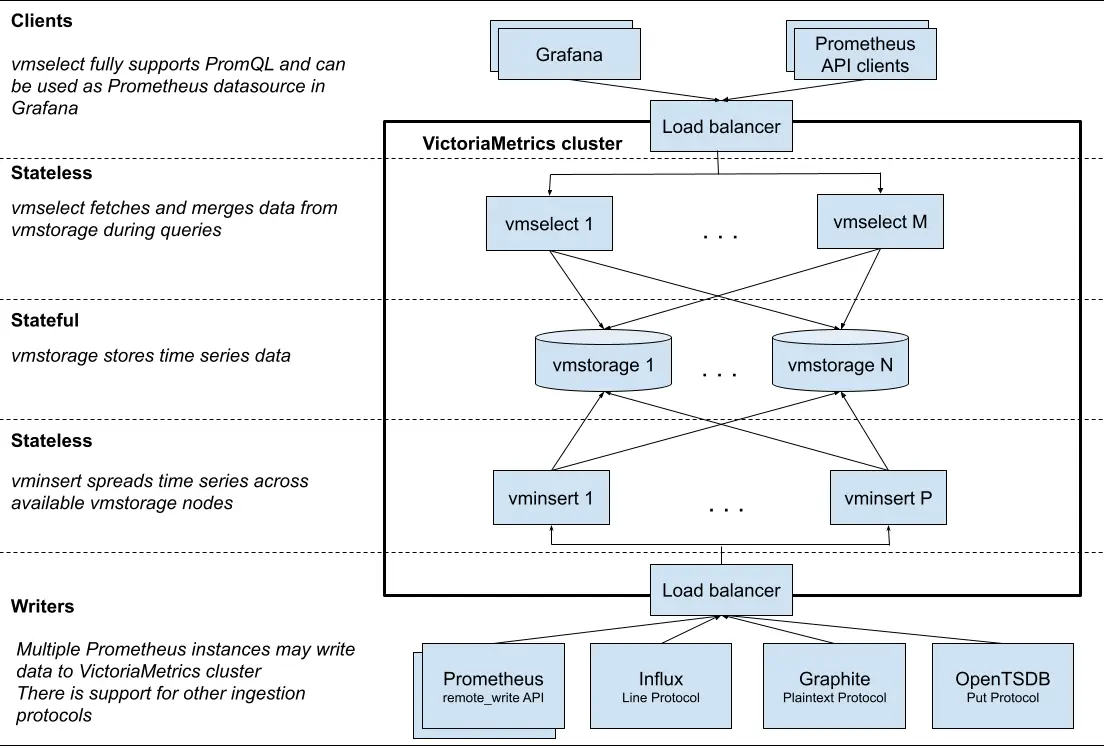
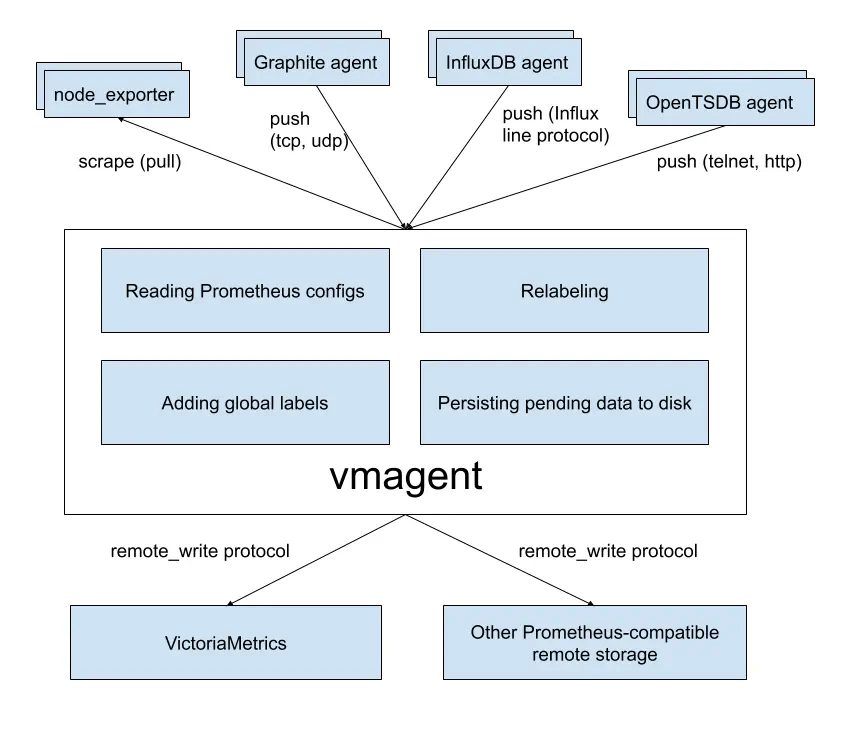
monitor exporter
OpenTelemetry
1 | ./otelcol --config=customconfig.yaml |
1 | ❯ ./otelcol validate --config=otel-collector-config.yaml |
otel-collector-config.yaml
otel-collector-config.yaml
##接收器
receivers:
  otlp:
    protocols:
      grpc:
        endpoint: 0.0.0.0:4317
      http:
        endpoint: 0.0.0.0:4318
  prometheus:
    config:
     scrape_configs:
       - job_name: 'elasticsearch-monitoring'
         scrape_interval: 10s
         static_configs:
           - targets: ['local.org:9114']
       - job_name: 'skywalking-so11y'
         scrape_interval: 8s
         static_configs:
           - targets: ['local.org:11234']
             labels:
               host_name: http://localhost:11234
               service: oap-server
       - job_name: 'nginx-monitoring'
         scrape_interval: 10s
         metrics_path: "/metrics"
         static_configs:
            - targets: ['local.org:9145']
              labels:
                 service: nginx-service
                 service_instance_id: e2e-test-instance
       # - job_name: 'apisix-monitoring'
       #   scrape_interval: 10s
       #   metrics_path: "/apisix/prometheus/metrics"
       #   static_configs:
       #      - targets: ['local.org:9091']
       #        labels:
       #          skywalking_service: showcase-apisix-service
       - job_name: "vm-monitoring" # make sure to use this in the vm.yaml to filter only VM metrics
         scrape_interval: 10s
         static_configs:
            - targets: ["local.org:9100"]
       - job_name: 'mysql-monitoring'
         scrape_interval: 5s
         static_configs:
           - targets: ['local.org:9104']
             labels:
               host_name: local.org:3305
       - job_name: "postgresql-monitoring"
         scrape_interval: 5s
         static_configs: #["postgres-exporter:9187","postgres-exporter_2:9187","postgres-exporter_3:9187"]
            - targets: ["local.org:9187"]
              labels:
                host_name: local.org:5433
       - job_name: 'redis-monitoring'
         scrape_interval: 5s
         static_configs:
           - targets: ['local.org:9121']
             labels:
               host_name: local.org:9121

processors:
  batch:

##导出器
exporters:
  otlp:
    endpoint: local.org:11800
    tls:
      insecure: true
  debug:

##扩展组件
extensions:
  health_check:
    endpoint: 0.0.0.0:13133
  pprof:
    endpoint: 0.0.0.0:1888
  zpages:
    endpoint: 0.0.0.0:55679

service:
  extensions: [health_check, pprof, zpages]
  pipelines:
    traces:
      receivers: [otlp]
      processors: [batch]
      exporters: [otlp,debug]
    metrics:
      receivers: [otlp,prometheus]
      processors: [batch]
      exporters: [otlp,debug]
    logs:
      receivers: [otlp]
      processors: [batch]
      exporters: [otlp]
gitlab ci
eg 多环境
stages stage only
stages:
  - build
  - test
  - deploy

job_build:
  stage: build
  script:
    - echo "Building the project..."
    # 添加构建项目的命令

job_test:
  stage: test
  script:
    - echo "Running tests..."
    # 添加运行测试的命令

job_deploy_staging:
  stage: deploy
  environment: staging
  script:
    - echo "Deploying to staging server..."
    # 添加部署到staging服务器的命令
  only:
    - master

job_deploy_production:
  stage: deploy
  environment: production
  script:
    - echo "Deploying to production server..."
    # 添加部署到production服务器的命令
  only:
    - tags
k8s upgrade
upgrade
1 | ❯ curl -O https://gh-proxy.com/https://github.com/kubernetes/kubernetes/archive/refs/tags/v1.27.16.tar.gz |
1 | ❯ ./kubeadm --image-repository registry.aliyuncs.com/google_containers config images list |
k8s HorizontalPodAutoscaler
type
resource metric
type: Resource #如 CPU 或内存利用率
custom metrics
Pod 度量指标
Object度量指标
VerticalPodAutoscaler
在集群中安装 Metrics Server
keepalived HA
keepalived
https://www.keepalived.org/download.html
1 | ❯ ./configure --prefix=/opt/keepalived/2.3.1 |
*** WARNING - this build will not support IPVS with IPv6. Please install libnl/libnl-3 dev libraries to support IPv6 with IPVS.
sudo apt-get install build-essential libnl-3-dev libnl-route-3-dev check libssl-dev