grafana install
dashboards
模板 https://grafana.com/grafana/dashboards/
node-exporter
https://grafana.com/grafana/dashboards/1860-node-exporter-full/
模板 https://grafana.com/grafana/dashboards/
https://grafana.com/grafana/dashboards/1860-node-exporter-full/
1 | ❯ sudo fdisk /dev/nvme0n1 -l |
分配未使用的分区
Command (m for help): F
Unpartitioned space /dev/nvme0n1: 1.09 TiB, 1195919875584 bytes, 2335781007 sectors
Units: sectors of 1 * 512 = 512 bytes
Sector size (logical/physical): 512 bytes / 512 bytes

     Start        End    Sectors  Size
1571248128 3907029134 2335781007  1.1T

Command (m for help): n
Partition number (8-128, default 8):
First sector (1571248128-3907029134, default 1571248128):
Last sector, +/-sectors or +/-size{K,M,G,T,P} (1571248128-3907029134, default 3907029134): +80G

Created a new partition 8 of type 'Linux filesystem' and of size 80 GiB.
uuid
+ 加法- 减法* 乘法/ 除法% 模^ 幂等https://prometheus.io/docs/prometheus/latest/querying/functions/
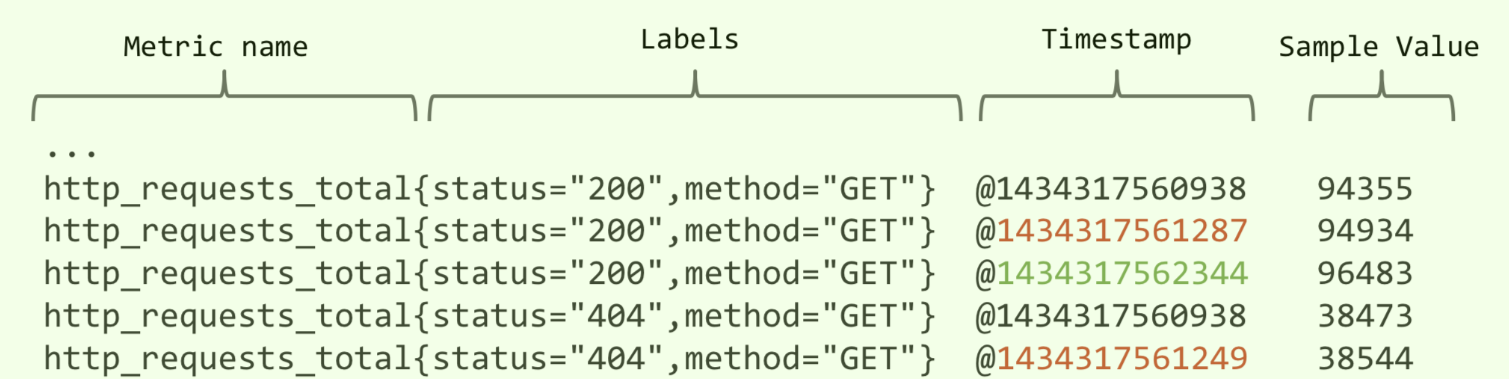
查询过去 5 分钟的****平均请求持续时间****:(平均的时间/平均的数量)
1 | rate(demo_api_request_duration_seconds_sum{job="demo"}[5m]) |
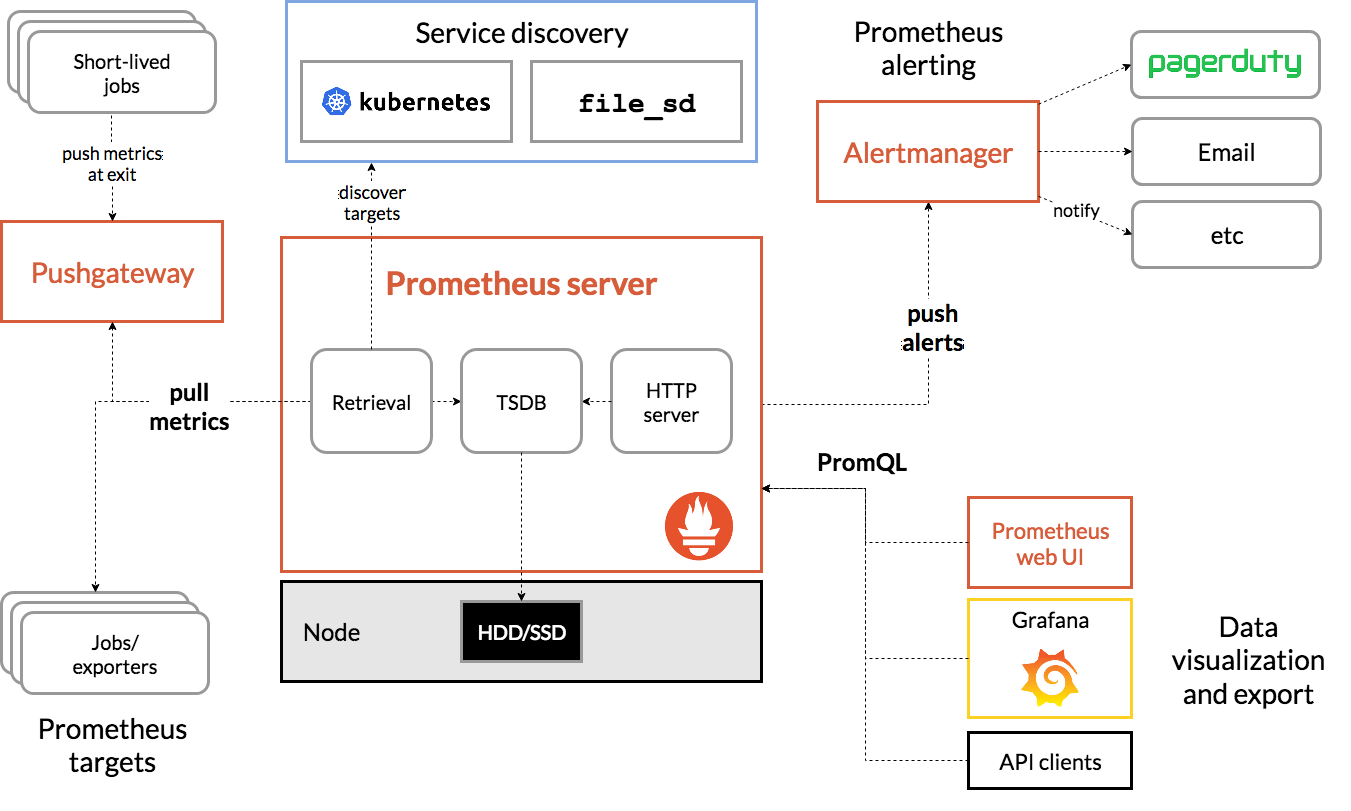
Prometheus内部主要分为三大块:
业务侧实现一个接口,返回Prometheus规范化数据
1 |
|
运维侧部署的时候,在svc上带上3个标签
1 | annotations: |
prometheus.io/scrape:
自动采集指标数据开关,默认为false;Prometheus会在k8s集群中自动检测哪些svc是打开了这个开关
prometheus.io/path:
采集指标数据路径,默认为 /metricsprometheus.io/port:
采集指标端口,默认为pod暴露的端口
storageClassName:
1 | securityContext: |
Unable to attach or mount volumes: unmounted volumes=[storage-volume], unattached volumes=[kube-api-access-jrz96 storage-volume config-volume]: timed out waiting for the condition
/var/lib/kubelet/pods/eb4c9f58-b7c7-4663-8f9a-1cc447c51fe6/volumes/kubernetes.io~nfs/prometheus-pv0 Output: mount.nfs: mounting 192.168.122.6:/opt/data/k8s/prometheus/pv0 failed, reason given by server: No such file or directory
检查权限
① 首先看nfs服务是否开启
② 其次看rpcbind是否开启
它支持从Let’s Encrypt,HashiCorp Vault,Venafi等颁发证书
Issuer/ClusterIssuer
Certificate
ACME Orders and Challenges
Webhook
CA Injector
1 |
|
https://cert-manager.io/docs/installation/helm/
1 | ❯ helm repo add jetstack https://charts.jetstack.io |
1 | helm install -f ./cert-manager/values.yaml \ |
1 | helm install -f ./cert-manager/values.yaml -name cert-manager --namespace cert-manager ./cert-manager --create-namespace --set webhook.timeoutSeconds=4 --set installCRDs=true |
https://kubernetes.io/zh-cn/docs/tasks/tools/install-kubectl-linux/
kubectl 版本和集群版本之间的差异必须在一个小版本号内。 例如:v1.28 版本的客户端能与 v1.27、 v1.28 和 v1.29 版本的控制面通信。 用最新兼容版的 kubectl 有助于避免不可预见的问题。
1 | apt-get install bash-completion |
Bash、Fish 和 Zsh
1 | echo $SHELL |
https://kubernetes.io/docs/reference/generated/kubectl/kubectl-commands#logs
https://raw.githubusercontent.com/kubernetes/dashboard/v2.7.0/aio/deploy/recommended.yaml
kubectl apply -f recommended.yaml
# Copyright 2017 The Kubernetes Authors.
#
# Licensed under the Apache License, Version 2.0 (the "License");
# you may not use this file except in compliance with the License.
# You may obtain a copy of the License at
#
#     http://www.apache.org/licenses/LICENSE-2.0
#
# Unless required by applicable law or agreed to in writing, software
# distributed under the License is distributed on an "AS IS" BASIS,
# WITHOUT WARRANTIES OR CONDITIONS OF ANY KIND, either express or implied.
# See the License for the specific language governing permissions and
# limitations under the License.

apiVersion: v1
kind: Namespace
metadata:
  name: kubernetes-dashboard

---

apiVersion: v1
kind: ServiceAccount
metadata:
  labels:
    k8s-app: kubernetes-dashboard
  name: kubernetes-dashboard
  namespace: kubernetes-dashboard

---

kind: Service
apiVersion: v1
metadata:
  labels:
    k8s-app: kubernetes-dashboard
  name: kubernetes-dashboard
  namespace: kubernetes-dashboard
spec:
  ports:
    - port: 443
      targetPort: 8443
  selector:
    k8s-app: kubernetes-dashboard

---

apiVersion: v1
kind: Secret
metadata:
  labels:
    k8s-app: kubernetes-dashboard
  name: kubernetes-dashboard-certs
  namespace: kubernetes-dashboard
type: Opaque

---

apiVersion: v1
kind: Secret
metadata:
  labels:
    k8s-app: kubernetes-dashboard
  name: kubernetes-dashboard-csrf
  namespace: kubernetes-dashboard
type: Opaque
data:
  csrf: ""

---

apiVersion: v1
kind: Secret
metadata:
  labels:
    k8s-app: kubernetes-dashboard
  name: kubernetes-dashboard-key-holder
  namespace: kubernetes-dashboard
type: Opaque

---

kind: ConfigMap
apiVersion: v1
metadata:
  labels:
    k8s-app: kubernetes-dashboard
  name: kubernetes-dashboard-settings
  namespace: kubernetes-dashboard

---

kind: Role
apiVersion: rbac.authorization.k8s.io/v1
metadata:
  labels:
    k8s-app: kubernetes-dashboard
  name: kubernetes-dashboard
  namespace: kubernetes-dashboard
rules:
  # Allow Dashboard to get, update and delete Dashboard exclusive secrets.
  - apiGroups: [""]
    resources: ["secrets"]
    resourceNames: ["kubernetes-dashboard-key-holder", "kubernetes-dashboard-certs", "kubernetes-dashboard-csrf"]
    verbs: ["get", "update", "delete"]
    # Allow Dashboard to get and update 'kubernetes-dashboard-settings' config map.
  - apiGroups: [""]
    resources: ["configmaps"]
    resourceNames: ["kubernetes-dashboard-settings"]
    verbs: ["get", "update"]
    # Allow Dashboard to get metrics.
  - apiGroups: [""]
    resources: ["services"]
    resourceNames: ["heapster", "dashboard-metrics-scraper"]
    verbs: ["proxy"]
  - apiGroups: [""]
    resources: ["services/proxy"]
    resourceNames: ["heapster", "http:heapster:", "https:heapster:", "dashboard-metrics-scraper", "http:dashboard-metrics-scraper"]
    verbs: ["get"]

---

kind: ClusterRole
apiVersion: rbac.authorization.k8s.io/v1
metadata:
  labels:
    k8s-app: kubernetes-dashboard
  name: kubernetes-dashboard
rules:
  # Allow Metrics Scraper to get metrics from the Metrics server
  - apiGroups: ["metrics.k8s.io"]
    resources: ["pods", "nodes"]
    verbs: ["get", "list", "watch"]

---

apiVersion: rbac.authorization.k8s.io/v1
kind: RoleBinding
metadata:
  labels:
    k8s-app: kubernetes-dashboard
  name: kubernetes-dashboard
  namespace: kubernetes-dashboard
roleRef:
  apiGroup: rbac.authorization.k8s.io
  kind: Role
  name: kubernetes-dashboard
subjects:
  - kind: ServiceAccount
    name: kubernetes-dashboard
    namespace: kubernetes-dashboard

---

apiVersion: rbac.authorization.k8s.io/v1
kind: ClusterRoleBinding
metadata:
  name: kubernetes-dashboard
roleRef:
  apiGroup: rbac.authorization.k8s.io
  kind: ClusterRole
  name: kubernetes-dashboard
subjects:
  - kind: ServiceAccount
    name: kubernetes-dashboard
    namespace: kubernetes-dashboard

---

kind: Deployment
apiVersion: apps/v1
metadata:
  labels:
    k8s-app: kubernetes-dashboard
  name: kubernetes-dashboard
  namespace: kubernetes-dashboard
spec:
  replicas: 1
  revisionHistoryLimit: 10
  selector:
    matchLabels:
      k8s-app: kubernetes-dashboard
  template:
    metadata:
      labels:
        k8s-app: kubernetes-dashboard
    spec:
      securityContext:
        seccompProfile:
          type: RuntimeDefault
      containers:
        - name: kubernetes-dashboard
          image: kubernetesui/dashboard:v2.7.0
          imagePullPolicy: Always
          ports:
            - containerPort: 8443
              protocol: TCP
          args:
            - --auto-generate-certificates
            - --namespace=kubernetes-dashboard
            # Uncomment the following line to manually specify Kubernetes API server Host
            # If not specified, Dashboard will attempt to auto discover the API server and connect
            # to it. Uncomment only if the default does not work.
            # - --apiserver-host=http://my-address:port
          volumeMounts:
            - name: kubernetes-dashboard-certs
              mountPath: /certs
              # Create on-disk volume to store exec logs
            - mountPath: /tmp
              name: tmp-volume
          livenessProbe:
            httpGet:
              scheme: HTTPS
              path: /
              port: 8443
            initialDelaySeconds: 30
            timeoutSeconds: 30
          securityContext:
            allowPrivilegeEscalation: false
            readOnlyRootFilesystem: true
            runAsUser: 1001
            runAsGroup: 2001
      volumes:
        - name: kubernetes-dashboard-certs
          secret:
            secretName: kubernetes-dashboard-certs
        - name: tmp-volume
          emptyDir: {}
      serviceAccountName: kubernetes-dashboard
      nodeSelector:
        "kubernetes.io/os": linux
      # Comment the following tolerations if Dashboard must not be deployed on master
      tolerations:
        - key: node-role.kubernetes.io/master
          effect: NoSchedule

---

kind: Service
apiVersion: v1
metadata:
  labels:
    k8s-app: dashboard-metrics-scraper
  name: dashboard-metrics-scraper
  namespace: kubernetes-dashboard
spec:
  ports:
    - port: 8000
      targetPort: 8000
  selector:
    k8s-app: dashboard-metrics-scraper

---

kind: Deployment
apiVersion: apps/v1
metadata:
  labels:
    k8s-app: dashboard-metrics-scraper
  name: dashboard-metrics-scraper
  namespace: kubernetes-dashboard
spec:
  replicas: 1
  revisionHistoryLimit: 10
  selector:
    matchLabels:
      k8s-app: dashboard-metrics-scraper
  template:
    metadata:
      labels:
        k8s-app: dashboard-metrics-scraper
    spec:
      securityContext:
        seccompProfile:
          type: RuntimeDefault
      containers:
        - name: dashboard-metrics-scraper
          image: kubernetesui/metrics-scraper:v1.0.8
          ports:
            - containerPort: 8000
              protocol: TCP
          livenessProbe:
            httpGet:
              scheme: HTTP
              path: /
              port: 8000
            initialDelaySeconds: 30
            timeoutSeconds: 30
          volumeMounts:
          - mountPath: /tmp
            name: tmp-volume
          securityContext:
            allowPrivilegeEscalation: false
            readOnlyRootFilesystem: true
            runAsUser: 1001
            runAsGroup: 2001
      serviceAccountName: kubernetes-dashboard
      nodeSelector:
        "kubernetes.io/os": linux
      # Comment the following tolerations if Dashboard must not be deployed on master
      tolerations:
        - key: node-role.kubernetes.io/master
          effect: NoSchedule
      volumes:
        - name: tmp-volume
          emptyDir: {}
1 | kubectl apply -f https://raw.githubusercontent.com/kubernetes/dashboard/v2.7.0/aio/deploy/recommended.yaml |
❯ grep “image: kubernetesui” ./recommended.yaml
image: kubernetesui/dashboard:v2.7.0
image: kubernetesui/metrics-scraper:v1.0.8