系统版本
1 | cat /etc/redhat-release |
el7是RHEL7系列的,centos7看到
1 | ❯ uname -r |
debian11
图形界面
xface
1 | #查看当前启动模式 |
命令行界面—>图形界面
执行startx命令
图形界面—>命令行界面
Ctrl+Alt+F2
CPU信息
1 | ❯ sudo dmidecode | grep -A16 "Memory Device" | grep 'Type:\|Speed\|Size:' |grep -v "Unknown\|Installed\|Range" |
Size: 8 GB
Type: DDR4
Speed: 2400 MT/s
Size: 8 GB
Type: DDR4
Speed: 2400 MT/s
CPU主频:
1 | ❯ sudo dmidecode -t processor | grep "Speed" |
Max Speed: 8300 MHz
Current Speed: 2700 MHz
1 | ❯ lscpu | grep "MHz" |
1 | ❯ cat /sys/devices/system/cpu/cpu0/cpufreq/cpuinfo_max_freq |
引导
启动
1 | #选择系统图 |
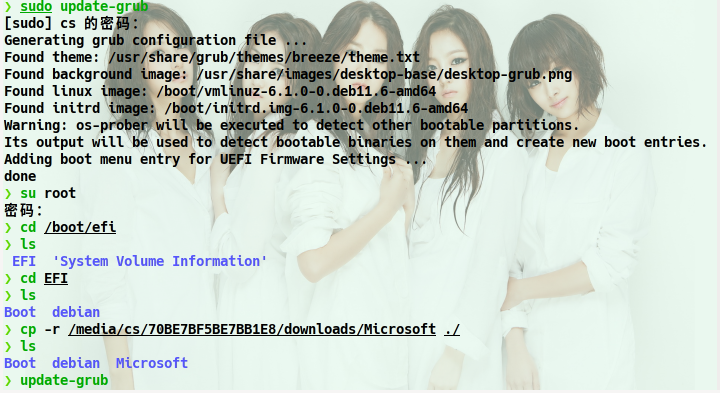
双系统boot
1 | cs@debian:~$ sudo tree /boot/efi/EFI -L 2 |
1 | cs@debian:~$ sudo update-grub |
https://www.cnblogs.com/coding-my-life/p/12817690.html
备份
步骤
新盘先装系统分好盘
新系统内核与老系统版本一致
1 | ❯ uname -r |
查看安装的内核
1 | dpkg --get-selections | grep linux-image |
卸载无用内核
1 | sudo apt-get purge linux-image-4.2.0-16-generic |
建议先卸载比较老的内核,不需要的可以删除。正常情况下,除正在使用的其它的都可以卸载,但是由于考虑到刚升级的版本可能不稳定,所以最好保留1个旧版本备用。
进入原系统
备份目录,解压到新系统目录
1 | #用户目录配置信息文件 |
–exclude 权限问题无法或无需备份的进行过滤文件目录
提前备份新旧系统的2个文件
/etc/fstab(fstab 盘符uuid不一样)
/boot/grub/grub.cfg (grub.cfg 盘符uuid不一样)
登陆新系统验证
grub
win
win os u盘修复win引导在esp盘
linux
无法进入grub
linux u盘 引导修复 ,主要是挂载目录到shell环境
grub>
在救援模式下只有很少的命令可以用:set , ls , insmod , root , prefix
- ls 查看设备
- set 查看环境变量,这里可以查看启动路径和分区。
- root 指定用于启动系统的分区,在救援模式下设置grub启动分区
- prefix 设定grub启动路径
- insmod 加载模块normal
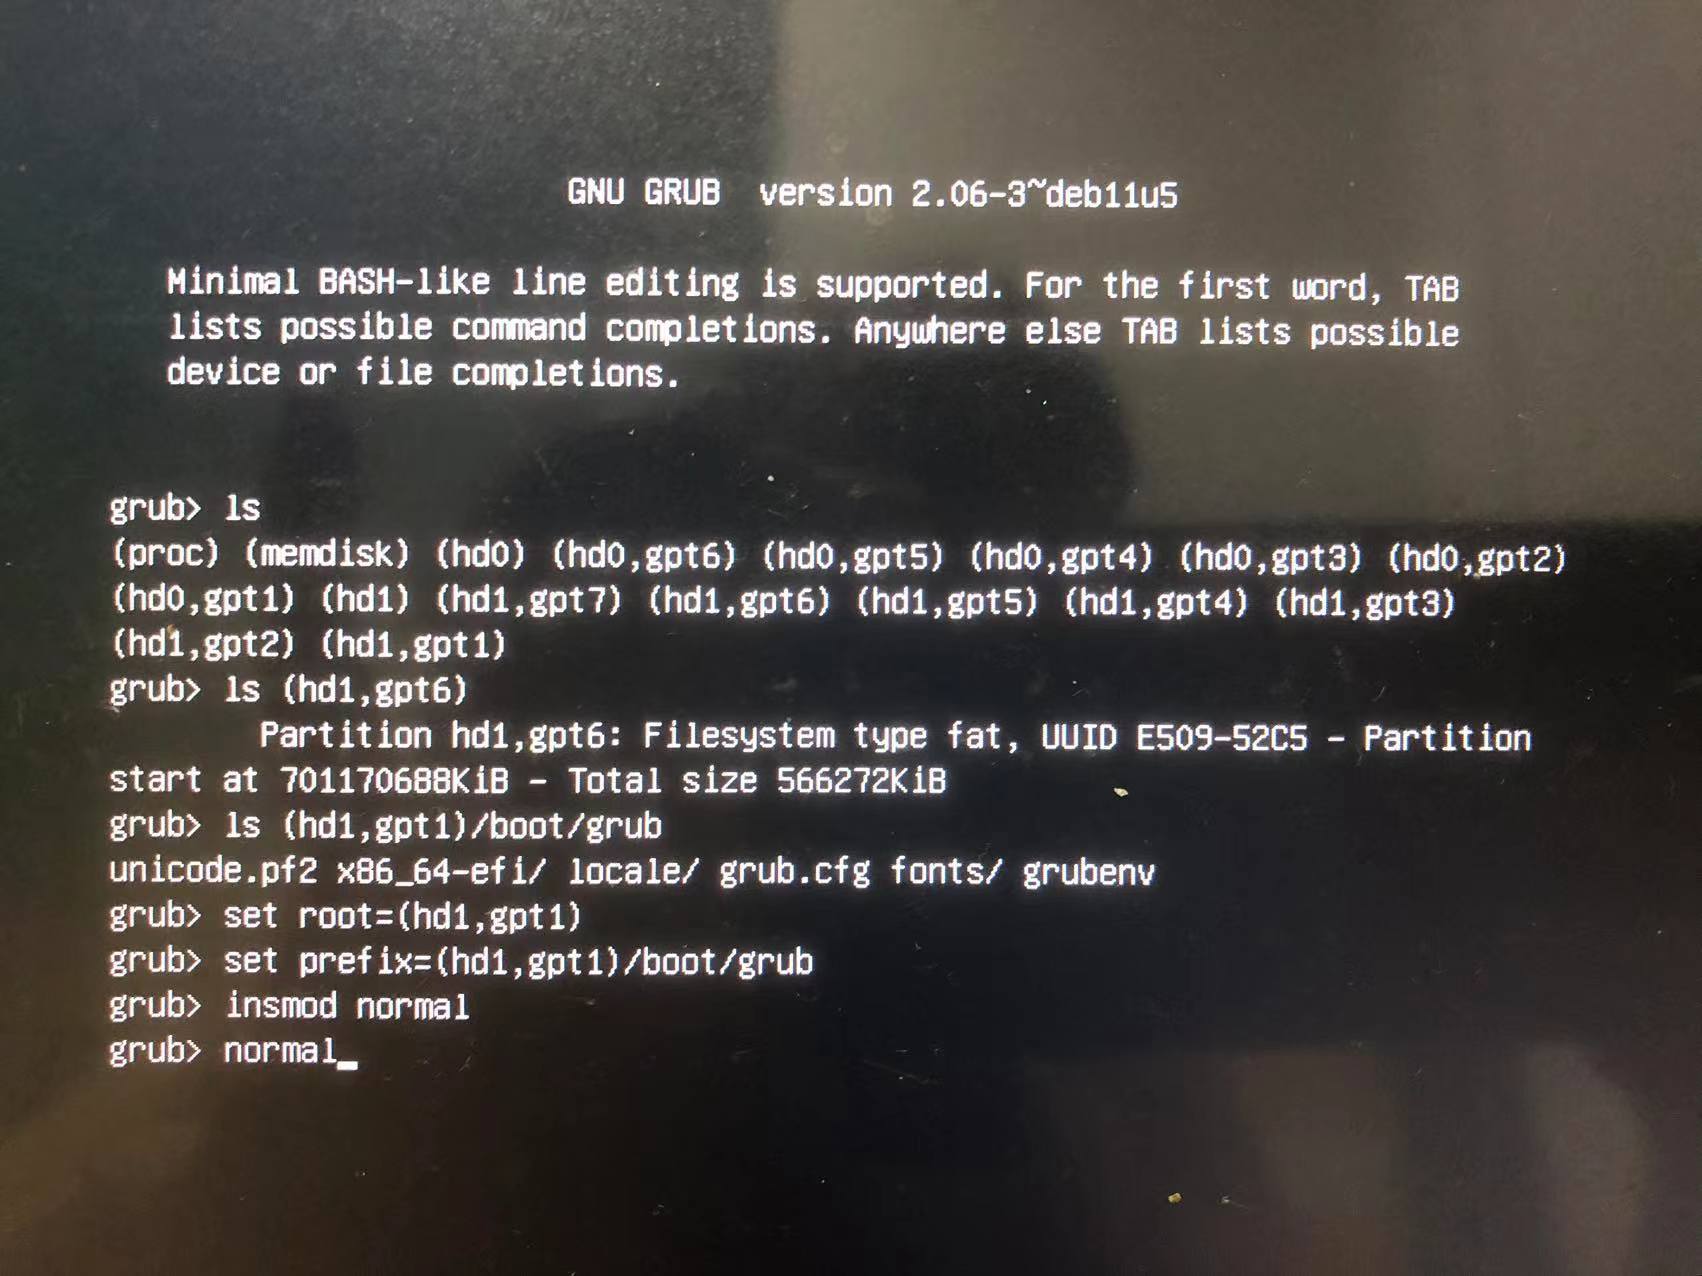
1 | grub rescue>set root=(hd0,gpt4) |
出现选择界面,进入系统
1 | ❯ update-grub |
直接操作 update-grub 会导致每次都是 grub> ,重新设置启动 grub-install
grub-install /dev/nvme0n1p1
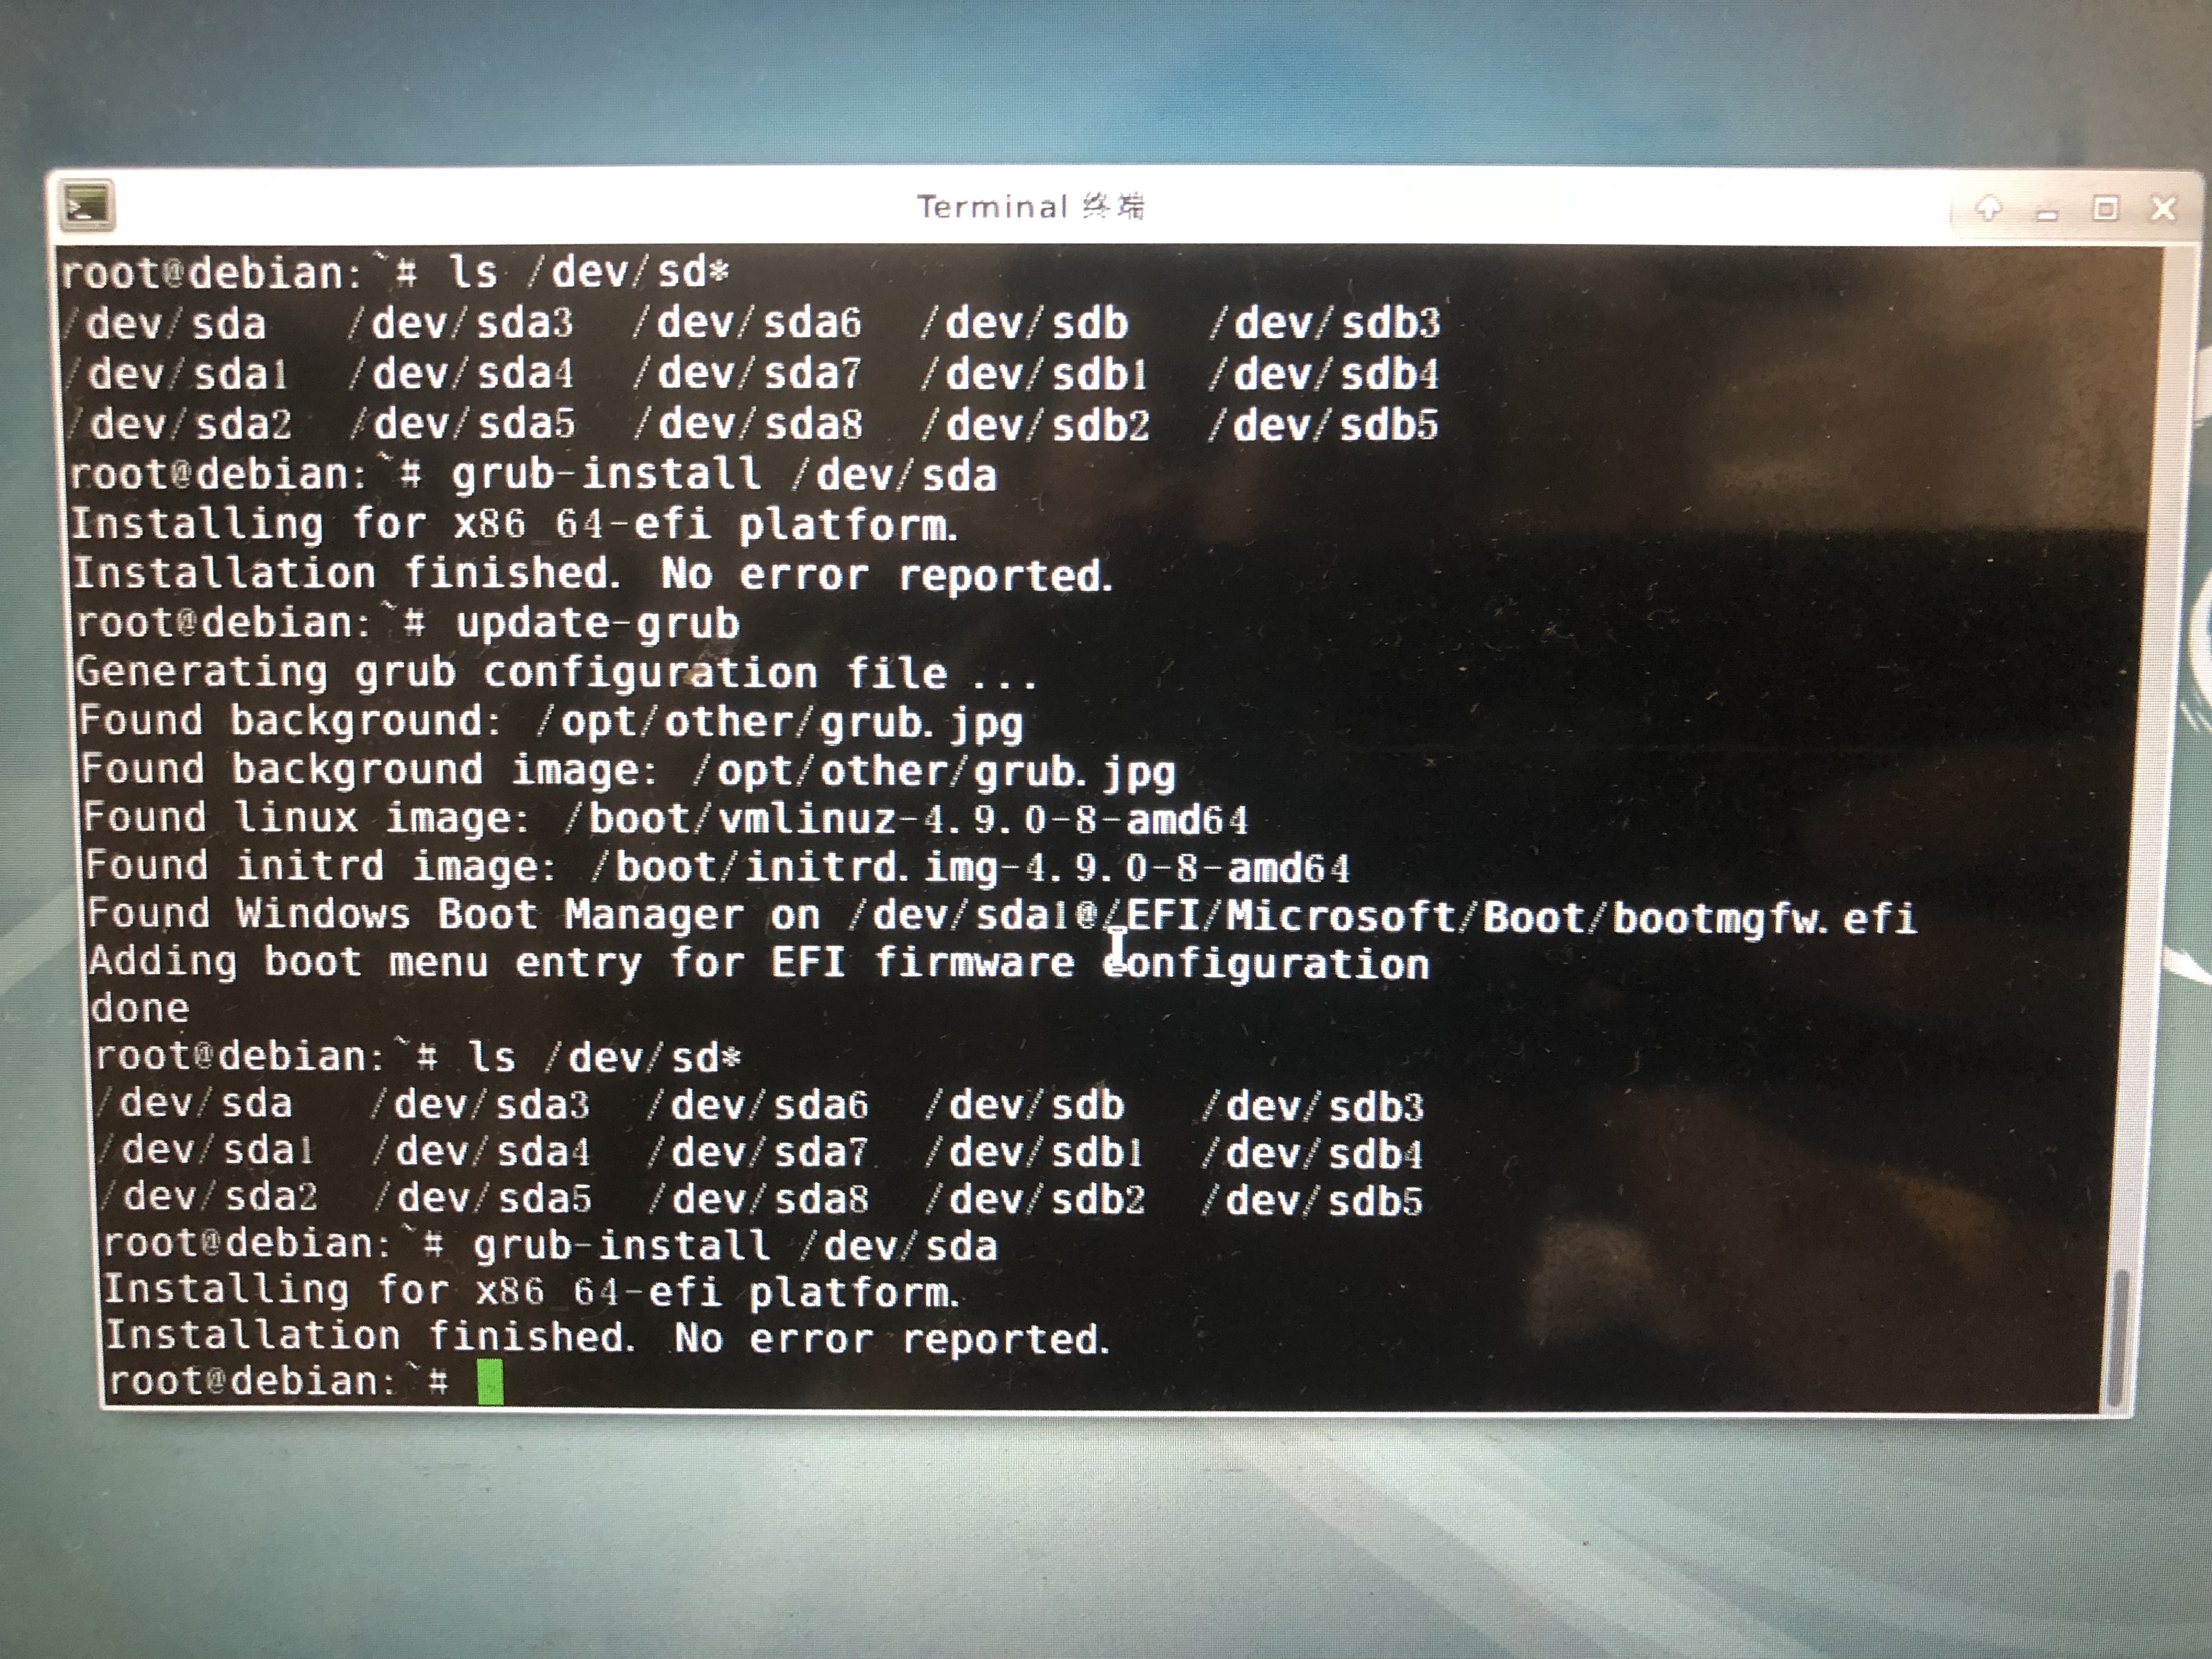
在进入系统之后,通过grub-install脚本进行安装grub,原先在/boot/grub下的stage文件都删除也没关系,该脚本每次执行都会删除这些文件的。
| 参数(可省略) | 含义 |
|---|---|
| –root-directory | 在指定目录安装GRUB镜像 |
| –grub-shell | 使用指定文件作为GRUB Shell |
| –no-floppy | 不探测任何软盘驱动器 |
https://www.cnblogs.com/zhengah/p/4238396.html
new
old
盘/etc/fstab
1 | ❯ sudo lsblk -o name,uuid |
分区
分配未使用的分区
❯ sudo fdisk /dev/nvme0n1
Welcome to fdisk (util-linux 2.38.1).
Changes will remain in memory only, until you decide to write them.
Be careful before using the write command.This disk is currently in use - repartitioning is probably a bad idea.
It’s recommended to umount all file systems, and swapoff all swap
partitions on this disk.Command (m for help): F
Unpartitioned space /dev/nvme0n1: 503.79 GiB, 540936314368 bytes, 1056516239 sectors
Units: sectors of 1 * 512 = 512 bytes
Sector size (logical/physical): 512 bytes / 512 bytes
-
Start End Sectors Size
2850512896 3907029134 1056516239 503.8G
-
Command (m for help): n
Partition number (11-128, default 11): 默认按回车
First sector (2850512896-3907029134, default 2850512896): 默认按回车
Last sector, +/-sectors or +/-size{K,M,G,T,P} (2850512896-3907029134, default 3907028991): +150GCreated a new partition 11 of type ‘Linux filesystem’ and of size 150 GiB.
Command (m for help): w
The partition table has been altered.
Syncing disks.##不保存,退出q
Command (m for help): q
新分区分配lvm
创建pv,vg,lv
❯ sudo fdisk /dev/nvme0n1 -l
Disk /dev/nvme0n1: 1.82 TiB, 2000398934016 bytes, 3907029168 sectors
Disk model: KINGSTON SNV2S2000G
Units: sectors of 1 * 512 = 512 bytes
Sector size (logical/physical): 512 bytes / 512 bytes
I/O size (minimum/optimal): 512 bytes / 512 bytes
Disklabel type: gpt
Disk identifier: 567141B0-39E4-467E-B67D-61B05D225406

Device               Start        End   Sectors   Size Type
/dev/nvme0n1p1        2048  117186559 117184512  55.9G Linux filesystem
/dev/nvme0n1p2   117186560  234373119 117186560  55.9G Linux filesystem
/dev/nvme0n1p3   234373120  644530175 410157056 195.6G Linux filesystem
/dev/nvme0n1p4   644530176 1386717183 742187008 353.9G Linux filesystem
/dev/nvme0n1p5  1386717184 1402341375  15624192   7.5G Linux swap
/dev/nvme0n1p6  1402341376 1403473919   1132544   553M EFI System
/dev/nvme0n1p7  1403473920 1571248127 167774208    80G Microsoft basic data
/dev/nvme0n1p8  1571248128 1739020287 167772160    80G Linux filesystem
/dev/nvme0n1p9  1739020288 2263308287 524288000   250G Linux filesystem
/dev/nvme0n1p10 2263308288 2850512895 587204608   280G Microsoft basic data
/dev/nvme0n1p11 2850512896 3102171135 251658240   120G Linux filesystem
❯ sudo pvcreate /dev/nvme0n1p11
  Physical volume "/dev/nvme0n1p11" successfully created.
❯ sudo vgcreate vgoss /dev/nvme0n1p11
  Volume group "vgoss" successfully created
❯ sudo lvcreate -l 100%VG  -n lv-oss vgoss
  Logical volume "lv-oss" created.
❯ sudo lvdisplay
  --- Logical volume ---
  LV Path                /dev/vgoss/lv-oss
  LV Name                lv-oss
  VG Name                vgoss
  LV UUID                RRAqG8-8ReS-RixP-KeCR-DbjH-C6we-NN35wv
  LV Write Access        read/write
  LV Creation host, time debian, 2024-09-06 22:23:09 +0800
  LV Status              available
  # open                 0
  LV Size                <120.00 GiB
  Current LE             30719
  Segments               1
  Allocation             inherit
  Read ahead sectors     auto
  - currently set to     256
  Block device           254:2
lvm
❯ sudo pvcreate /dev/sda6 分区创建物理卷
WARNING: dos signature detected on /dev/sda6 at offset 510. Wipe it? [y/n]: y
Wiping dos signature on /dev/sda6.
Physical volume “/dev/sda6” successfully created.
❯ sudo vgcreate vgdata /dev/sda6
Volume group “vgdata” successfully created
❯ sudo vgdisplay
— Volume group —
VG Namevgdata
System ID
Format lvm2…..
❯ sudo vgcreate vgdata /dev/sda6
A volume group called vgdata already exists.
❯ sudo lvcreate -l 100%VG -n lv-images vgdata 将新加的硬盘卷组的空间百分百创建为逻辑卷
Logical volume “lv-images” created.
❯ sudo lvdisplay
— Logical volume —
LV Path/dev/vgdata/lv-images
LV Name lv-images
VG Name vgdata
LV UUID ZesxQK-m3gy-Gd2v-mvtl-VzOw-bcjn-5HHyvD
LV Write Access read/write
LV Creation host, time debian, 2024-08-25 16:36:06 +0800
LV Statusavailable…..
❯ sudo mkfs.xfs /dev/vgdata/lv-images
meta-data=/dev/vgdata/lv-images isize=512 agcount=4, agsize=7910656 blks
= sectsz=4096 attr=2, projid32bit=1
= crc=1 finobt=1, sparse=1, rmapbt=0
= reflink=1 bigtime=1 inobtcount=1 nrext64=0
data = bsize=4096 blocks=31642624, imaxpct=25
= sunit=0 swidth=0 blks
naming =version 2 bsize=4096 ascii-ci=0, ftype=1
log =internal log bsize=4096 blocks=16384, version=2
= sectsz=4096 sunit=1 blks, lazy-count=1
realtime =none extsz=4096 blocks=0, rtextents=0….
扩展卷组 vgextend
扩展卷组以包含新的物理卷
vgextend
vg添加
❯ sudo vgextend vgdata /dev/sda3
Volume group "vgdata" successfully extended

❯ sudo lvcreate -l 100%VG  -n lv-kvm vgdata
Reducing 100%VG to remaining free space <108.61 GiB in VG.
Logical volume "lv-kvm" created.
扩展逻辑卷 lvextend
1 | sudo lvextend -l +100%FREE /dev/VolumeGroupName/LogicalVolumeName |
减小
调整文件系统大小
ext4
1 | sudo resize2fs /dev/VolumeGroupName/LogicalVolumeName |
xfs
1 | sudo xfs_growfs /dev/VolumeGroupName/LogicalVolumeName |
减小 ext4
1 | sudo umount /dev/mapper/VolumeGroupName-LogicalVolumeName |
lvreduce 撤回
你只是想要撤销 lvextend 操作,并且没有对逻辑卷进行任何写操作(即没有使用新增的空间),你可以简单地使用 lvreduce 命令将逻辑卷缩小到原来的大小
size 大小
1 | sudo lvreduce -L NewSize /dev/VolumeGroupName/LogicalVolumeName #谨慎操作 |
PE大小
你不确定逻辑卷的 PE 大小,你可以使用 pvdisplay 和 lvdisplay 命令来查看这些信息
1 | sudo lvreduce -l NewLEs /dev/VolumeGroupName/LogicalVolumeName #谨慎操作 |
❯ sudo lvdisplay
— Logical volume —
LV Path /dev/vgoss/lv-oss
LV Name lv-oss
VG Name vgoss
LV UUID RRAqG8-8ReS-RixP-KeCR-DbjH-C6we-NN35wv
LV Write Access read/write
LV Creation host, time debian, 2024-09-06 22:23:09 +0800
LV Status available
# open 1
LV Size <120.00 GiB
Current LE 30719 #PE
Segments 1
Allocation inherit
Read ahead sectors auto
- currently set to 256
Block device 254:2
格式化
1 | ❯ sudo mkfs.xfs /dev/sda6 |
new
1 | # <file system> <mount point> <type> <options> <dump> <pass> |
old
1 | # <file system> <mount point> <type> <options> <dump> <pass> |
upgrade
更新本地包索引
1 | sudo apt update |
安装可用更新
1 | $ sudo apt upgrade |
重启
1 | sudo reboot |
$ sudo apt-mark showhold | more
$ sudo apt-mark unhold
备份源
1 | sudo cp -v /etc/apt/sources.list /opt/sources.list-bakup-debian11 |
升级系统
1 | sudo apt full-upgrade |
Pres-q-to-Proceed-further-Debian-Upgrade 按 q 继续下一步
Keep-Local-Verison-SSHD-During-Debian-Upgrade
Keep-Local-Grub-Version-During-Debian-Upgrade
重启
1 | sudo reboot |
error
mdadm: no arrays found in config file or automatically

1 | #debian |
This is the initramfs configuration where mdadm.conf is copied and some magic happens to start the array. Did you create a md raid array or use btrfs array options? If you used mdadm then
mdadm --detail --scan >> /etc/mdadm/mdadm.confwill add the array configuration andupdate-initramfs -u -k allwill create a new initramfs image. The resume entry is in/etc/initramfs-tools/conf.d/resumeif you want to change that (i had to change it to ‘none’ for encrypted swap).https://www.reddit.com/r/debian/comments/h8b0am/dell_optiplex_390_gets_stuck_on_mdadm_no_arrays/