elasticsearch 目录结构
| type | description | location |
|---|---|---|
| home | Home of elasticsearch installation | /usr/share/elasticsearch |
| bin | Binary scripts including elasticsearch to start a node | /usr/share/elasticsearch/bin |
| conf | Configuration files elasticsearch.yml and logging.yml | /etc/elasticsearch |
| conf | Environment variables including heap size,file descriptors | /etc/default/elasticsearch |
| data | The location of the data files | /var/lib/elasticsearch/ |
| logs | Log files location | /var/log/elasticsearch |
| plugins | Plugin files location | /usr/share/elasticsearch/plugins |
下载地址
2.4.1
window7
bin目录执行安装
1 | F:\ELK\elasticsearch-2.4.1\bin>service install |
安装成功,如果启动失败(进logs目录,查看错误信息)
1 | [error] [ 6376] Failed creating java %JAVA_HOME%\jre\bin\server\jvm.dll |
直接利用管理服务
1
2 #运行 service manager 会弹出服务管理界面 修改jvm指定路径
F:\ELK\elasticsearch-2.4.1\bin>service manager
debian8
1 | sudo dpkg -i elasticsearch-2.4.2.deb |
需要授权执行命令 chmod +x bin/elasticsearch
再次执行 ./elasticsearch -d 即可后台启动
使用 ps aux|grep elasticsearch 可以查看是否启动
设置开机启动
创建脚本 start.sh
1 | #!bin/bash |
修改启动文件 mousepad /etc/init.d/elasticsearch
1 | #!bin/bash |
7.17.1
https://www.elastic.co/guide/en/elasticsearch/reference/7.17/security-basic-setup-https.html
根证书ca
1 | ❯ ./bin/elasticsearch-certutil ca |
节点证书
1 | ❯ ./bin/elasticsearch-certutil cert --ca ./config/cert/elastic-stack-ca.p12 |
Enter password for CA (config/cert/elastic-stack-ca.p12) : pwd
Please enter the desired output file [elastic-certificates.p12]:
Enter password for elastic-certificates.p12 : pwd
ssl
ssl.yml
1 | instances: |
1 | ./bin/elasticsearch-certutil cert ca --pem --in ssl.yml --out certs.zip |
1 | ❯ ./bin/elasticsearch-setup-passwords interactive |
https://www.elastic.co/guide/en/elasticsearch/reference/7.16/security-basic-setup.html
1 | #配置集群密码 |
elastic-stack-ca.p12 包含 cakey (java.lang.IllegalArgumentException: you cannot specify a truststore and ca files)
❯ ./elasticsearch-certutil ca
warning: usage of JAVA_HOME is deprecated, use ES_JAVA_HOME
/opt/jdk/jdk-11.0.12/bin/java -Xshare:auto -cp /opt/ELK/elasticsearch-7.17.1/lib/* org.elasticsearch.tools.java_version_checker.JavaVersionChecker
This tool assists you in the generation of X.509 certificates and certificate
signing requests for use with SSL/TLS in the Elastic stack.The ‘ca’ mode generates a new ‘certificate authority’
This will create a new X.509 certificate and private key that can be used
to sign certificate when running in ‘cert’ mode.Use the ‘ca-dn’ option if you wish to configure the ‘distinguished name’
of the certificate authorityBy default the ‘ca’ mode produces a single PKCS#12 output file which holds:
- The CA certificate
- The CA’s private key
If you elect to generate PEM format certificates (the -pem option), then the output will
be a zip file containing individual files for the CA certificate and private keyPlease enter the desired output file [elastic-stack-ca.p12]: 此位置设置文档输出地址和名称。默认名称为elastic-stack-ca.p12
Enter password for elastic-stack-ca.p12 : cs123456#等价配置yaml内的xpack.security.http.ssl.keystore.password:
❯ ./bin/elasticsearch-keystore add xpack.security.transport.ssl.keystore.secure_password
warning: usage of JAVA_HOME is deprecated, use ES_JAVA_HOME
/opt/jdk/jdk-11.0.12/bin/java -Xshare:auto -cp /opt/ELK/elasticsearch-7.17.1/lib/* org.elasticsearch.tools.java_version_checker.JavaVersionChecker
Enter value for xpack.security.transport.ssl.keystore.secure_password: cs123456
❯ ./bin/elasticsearch-keystore add xpack.security.transport.ssl.truststore.secure_password
warning: usage of JAVA_HOME is deprecated, use ES_JAVA_HOME
/opt/jdk/jdk-11.0.12/bin/java -Xshare:auto -cp /opt/ELK/elasticsearch-7.17.1/lib/* org.elasticsearch.tools.java_version_checker.JavaVersionChecker
Enter value for xpack.security.transport.ssl.truststore.secure_password: cs123456❯ ./bin/elasticsearch-keystore add xpack.security.http.ssl.truststore.secure_password
warning: usage of JAVA_HOME is deprecated, use ES_JAVA_HOME
/opt/jdk/jdk-11.0.12/bin/java -Xshare:auto -cp /opt/ELK/elasticsearch-7.17.1/lib/* org.elasticsearch.tools.java_version_checker.JavaVersionChecker
Enter value for xpack.security.http.ssl.truststore.secure_password:
❯ ./bin/elasticsearch-keystore add xpack.security.http.ssl.keystore.secure_password
warning: usage of JAVA_HOME is deprecated, use ES_JAVA_HOME
/opt/jdk/jdk-11.0.12/bin/java -Xshare:auto -cp /opt/ELK/elasticsearch-7.17.1/lib/* org.elasticsearch.tools.java_version_checker.JavaVersionChecker
Enter value for xpack.security.http.ssl.keystore.secure_password:
密码
重置 或设置新密码
1 | ./bin/elasticsearch-setup-passwords interactive |
error
No subject
安全证书的一个错误消息 No subject alternative names present 的解决办法
重新创建,添加该ip到证书里
CertPathValidatorException
Caused by: java.security.cert.CertPathValidatorException: Path does not chain with any of the trust anchors
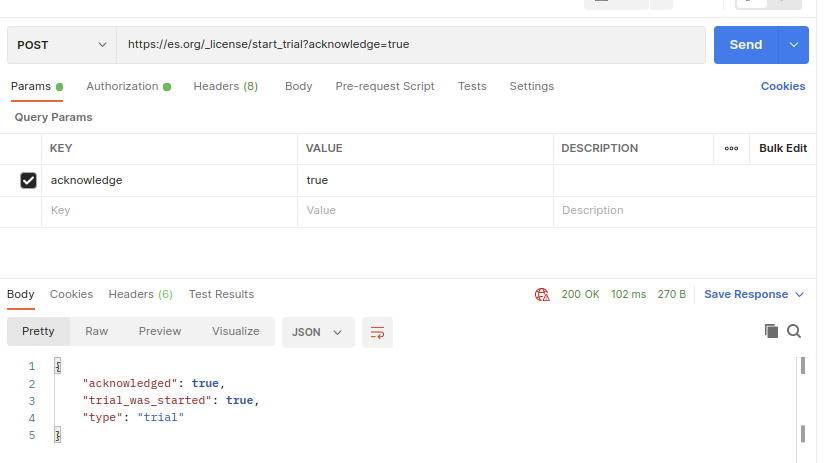
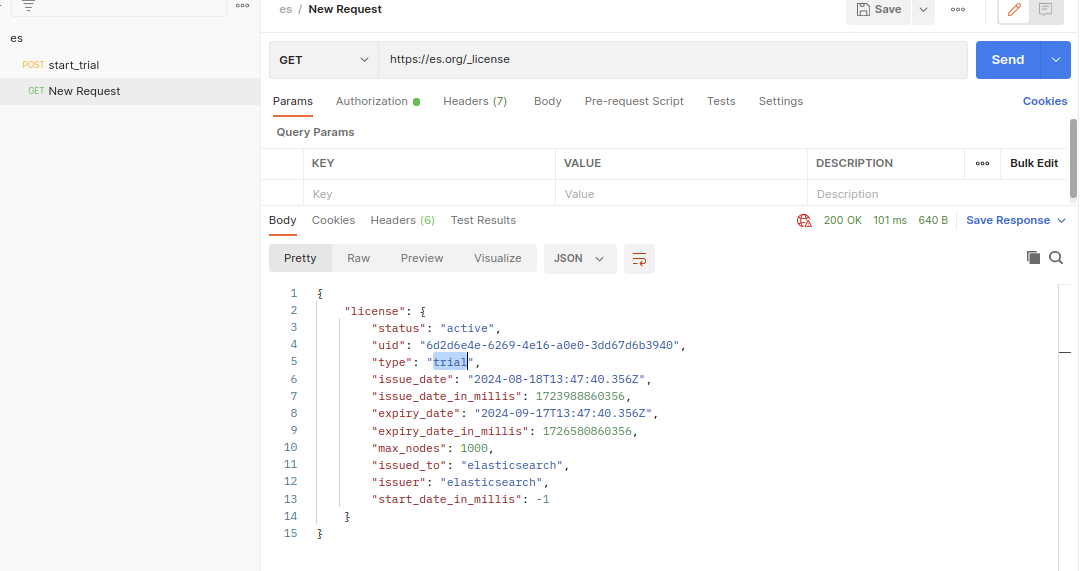
license
current license is non-compliant for [jdbc]
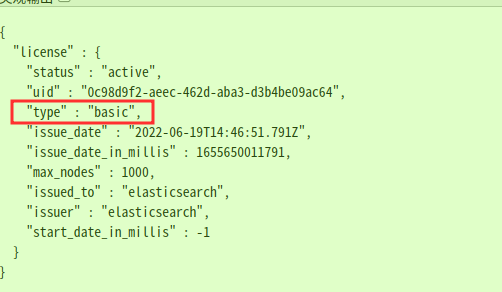
https://www.elastic.co/guide/en/elasticsearch/reference/master/start-trial.html
plugin
elasticsearch-prometheus-exporter
7.xx https://github.com/vvanholl/elasticsearch-prometheus-exporter/releases
1 | ./bin/elasticsearch-plugin install -b https://github.com/vvanholl/elasticsearch-prometheus-exporter/releases/download/7.17.7.0/prometheus-exporter-7.17.7.0.zip |
#方式二
#将离线包解压到ElasticSearch 安装目录下的 plugins 目录下
#重启es。新装插件必须要重启es
https://github.com/prometheus-community/elasticsearch_exporter
elasticsearch-sql
https://github.com/NLPchina/elasticsearch-sql/releases
elasticsearch-analysis-ik
https://github.com/infinilabs/analysis-ik/releases/tag/Latest